As mentioned in our previous articles, Autodock Vina [1] is a very useful bioinformatics tool for molecular docking and provides various options for site-specific docking and blind docking. But it seemed to be challenging to perform virtual screening using Autodock. Recently, Autodock has developed a plugin known as ‘Raccoon’ [2], which serves for this purpose.
Raccoon plugin provides a graphical user interface (GUI) to perform virtual screening using Autodock.
The users don’t have to prepare pdbqt files on their own, they can easily load the ligand and protein files in the Autodock using the Raccoon GUI and perform docking. It involves other features such as ligand filtration, generating configuration files for Autodock, automated generation of virtual screening script, multiple receptor conformations, and automated processing of ligand libraries.
The installation of this plugin is straightforward if you have already installed Autodock on your system, if not, then please follow this tutorial first.
How to install the Raccoon plugin on Ubuntu?
-
- Download the tar file of Raccoon (http://autodock.scripps.edu/resources/raccoon).
- save it in a directory let’s say, Downloads.
- Change to the Downloads directory and untar the file:
$ cd Downloads
$ tar xvzf raccoon-1.0b.tar.gz
You will notice a new ‘raccoon.py’ file has been added to the same directory.
4. Open a terminal (Ctrl+Alt+T) and change to the directory where you extracted the tar file and type the following commands:
$ cd Downloads
$ pythonsh raccoon.py
A GUI will be displayed as shown in Fig. 1.
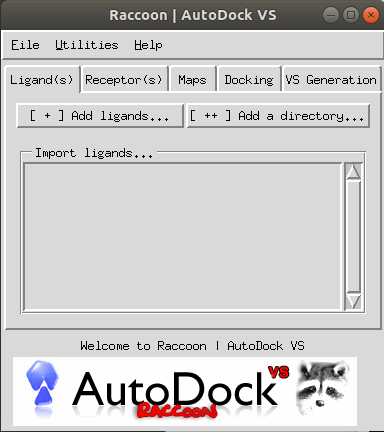
Fig.1 the GUI of Raccoon [2].
Now you have successfully installed the raccoon plugin on your system.
In most cases, pythonsh command is not recognized, then use the pythonsh from the installed MGL tools directory (let’s say, MGL Tools is a subdirectory of Downloads) and type the following commands:
$ /home/user/Downloads/mgltools_x86_64Linux2_1.5.6/bin/pythonsh raccoon.py
If you don’t want to type the full path every time you execute the raccoon script, then add an alias in your bashrc file using the following command:
$gedit ~/.bashrc
It will open the bashrc file, go at the end of this file and type the following:
$ alias raccoon='/home/user/Downloads/mgltools_x86_64Linux2_1.5.6/bin/pythonsh /home/user/Downloads/raccoon.py'
Save the file, go back to the terminal, and type:
$ source ~/.bashrc
For c-shell, use the following command:
$ alias raccoon '/home/user/Downloads/mgltools_x86_64Linux2_1.5.6/bin/pythonsh /home/user/Downloads/raccoon.py'
If you have any queries, then email muniba@bioinformaticsreview.com
References
- Trott, O., & Olson, A. J. (2010). AutoDock Vina: improving the speed and accuracy of docking with a new scoring function, efficient optimization, and multithreading. Journal of computational chemistry, 31(2), 455-461.
- Forli, S., Huey, R., Pique, M. E., Sanner, M. F., Goodsell, D. S., & Olson, A. J. (2016). Computational protein-ligand docking and virtual drug screening with the AutoDock suite. Nature Protocols, 11(5), 905-919.