AutoDock Vina is a bioinformatics tool that is used to perform in-silico docking of proteins with a ligand. It provides many options depending on the needs of a user. This tool offers blind docking and binding in a specific pocket as well, which is sometimes more demanding when the binding site is already known. This article will guide you to dock a protein with a ligand in a specific binding site/ pocket.
We are docking a protein Human Serum Albumin (HSA) protein with a ligand Sodium Octanoate (SO), but HSA is already complexed with 3-carboxy-4-methyl-5-propyl-furanpropanoic acid (CMPF). We want to bind SO in the same site where CMPF has already bound in HSA.
We need the following files prepared for docking with AutoDock Vina:
- Pdbqt files of protein and the ligand
- Configuration file
- Grid file
Preparation of PDB file before docking
- Download a protein crystal structure from PDB. We are using Human Serum Albumin complexed with 3-carboxy-4-methyl-5-propyl-furanpropanoic acid (CMPF) (PDB ID: 2BXA).
Before proceeding further, we should make clear whether we know the catalytic site of the protein or not. If we know then we can easily go to step 2, but if we don’t know, then we have two options, either we can read the literature which is available on the same page of PDB from where we downloaded the structure, or we can visualize the protein structure in PyMol and note down the interacting sites of the protein. The first option is recommended.
- Open the PDB file and remove HETATOMS.
The structure we are using is a crystal structure complexed with ligand(s), therefore, to dock the desired ligand with the protein in that particular position we need to remove the bound ligand by removing hetatoms from the PDB file. If we will dock our ligand without removing the already complexed ligand, then we will not get the correct results. We can also easily remove ligand by visualizing the protein in PyMol.
- After removing hetatoms, we will keep only one of the four chains (here, Chain A was taken). Remove the rest of the three chains, and save this file as “protein.pdb”
The chains are removed from the protein structure just to avoid complexity.
- Now save the file as “protein.pdb”.
Now we have prepared our protein structure to proceed further with docking. Now we will prepare our ligand which we want to dock with the protein.
Preparation of ligand before docking
- Open PubChem (www.pubchem.ncbi.nlm.nih.gov) and search for the compound. We are using “sodium octanoate” as a ligand. We can download the structure from the ZINC database also.
- Click on Sodium octanoate and look under the “3D Structure” section, click on “Download” and then you will see four different formats for downloading it. We will download the .SDF format.
- Since we need the protein and the ligand to be in a .pdb format, therefore, we have to convert .SDF to .pdb. We will use PyMol for this purpose and never use online converters because they may ruin your ligand file.
- Open PyMol, and open the downloaded ligand. Click on “File” –> “Save Molecule” –> select the molecule –> click “OK”. You can save it to your desired folder.
We will rename the ligand as “SO.pdb” just to avoid any kind of confusion. Now we have a PDB file of protein and that of the ligand. In order to perform docking, we need to prepare .pdbqt files from the .pdb files of the protein and the ligand, because docking through AutoDock Vina requires a .pdbqt file format to dock.
Preparation of .pdbqt files
First, we will prepare a .pdbqt file of the ligand.
- Open AutoDock Tools GUI –> click “Ligand” –> click “Input”–> click “Open”
It will ask to select your ligand, we will go to the folder where we have saved our ligand’s .pdb file and click “SO.pdb”.
- Click “Ligand” –> click “Torsion Tree” –> click “Detect Root”.
It will show the torsion angle on the ligand from where it can be rotated.
- Click “Ligand” –> click “Output” –> Click “Save as PDBQT”.
We can rename the ligand, but we will use the same name as before and will name it as “SO.pdbqt” and save it in the same folder.
We have prepared a .pdbqt file of the ligand and now we will prepare the protein file.
- Open AutoDock Tools GUI, click “File” –> click “Read Molecule” –> select protein.pdb.
- We will delete water molecules from the protein as they can make unnecessary bonds with the ligand. Click “Edit” –> “Delete water”.
- We will add polar hydrogens in order to avoid any empty group/ atom left in the protein. Click “Edit” –> click “Add Hydrogens” –> click “Polar only”.
- We will save this file as .pdbqt, click “Grid” –> click “Macromolecule” –> click “Choose” –> select the “protein.pdb” –> click “OK”. It will ask for a folder to save, then save it as “protein.pdbqt”, in the same folder where the pdbqt file of the ligand was saved.
Defining binding site
Now let’s define the binding site in the protein. Look at the panel in the left corner of the Vina window. You will see the name of the protein written there. Click on it once, then it will show you the chains present in the structure, but since we have deleted all the chains except chain A, therefore, there is only one chain, i.e., chain A. Click on it, then it will display all the residues present in the chain. Now scroll down and look for your desired residues. For example, in this protein, we will look for Tyr150, Lys199, Arg222, Arg257, and His242 because this is the binding site of CMPF in human serum albumin and we want to bind another ligand in the same position.
On the right side of the drop-down of all residues, we can see some squares and oval-shaped images. By clicking these, we can see the selected residues in different types, such as on clicking “R”, the residue will be displayed as a ribbon, but we will only select all the residues by clicking “S”. Now the selected residues will appear differently such as yellow in color. Now we have selected all the residues and we will define the grid box which can enclose all these residues inside itself.
Defining Grid Box for docking
Now we will define the specific site for the binding of a ligand in the protein. In blind docking, we do not need to define a specific site in the protein for the ligand to bind, because we do not know the binding site, so we enclose the whole protein into the grid box. But here we already know the binding site in this protein, therefore, we will define the binding site for the ligand in the grid box.
- Click “Grid” –> click “Grid Box”.
You will see a small window in which you can see x, y, and z coordinates.
- Now try to adjust the grid box by scrolling the three coordinates, such that it covers all the selected residues.
- After adjusting the grid box, click “File” –> click “Output Grid Dimension File” –> save this file as grid.txt in the same folder.
- Click “File” –> Click “Close saving current”.
- Now close the Autodock Vina.
You will get the grid file as follows:
grid.txt
|
protein spacing 0.375 npts 66 56 54 center 4.402 -8.060 8.874 |
Preparation of Configuration file
AutoDock Vina requires an input configuration file that contains all the information of the parameters used in configuring the docking including the name of the protein and the ligand. The configuration is as follows:
conf.txt
| receptor= protein.pdbqt
ligand= SO.pdbqt
center_x= 4.402 center_y= -8.060 center_z= 8.874
size_x= 66 size_y= 56 size_z= 54
out= vina_outSO.pdbqt log= logSO.txt
exhaustiveness= 8 |
From “grid.txt” file, we have written the center_x, y, and z coordinates, and also the size_x, y, and z of the grid box. Save this file as “conf.txt”.
Perform Docking
Put all the following in the same folder (i.e., dock):
- protein.pdbqt
- SO.pdbqt
- conf.txt
- All the MGL_Tools, Autodock Tools, Python.exe (for Linux), and Autodock Vina setup files.
Please keep in mind that you have named the files properly and kept all the setup files in the same folder otherwise you may get errors while running the docking.
Linux
- Open the terminal and enter into the “dock” folder.
- Type the following command:
./vina --config conf.txt --log logSO.txt
- Press “enter”.
Windows
- Open the command prompt and enter the folder where all the docking files are placed.
- Type the following command:
vina.exe --config conf.txt --log logSO.txt
Now grab a cup of tea/ coffee because it may take a few minutes to complete the docking, so meanwhile, enjoy your time! 😉
Vina Output
After the successful docking, you will get a log file, which in this case is named “logSO.txt”.
The log file will be as follows:
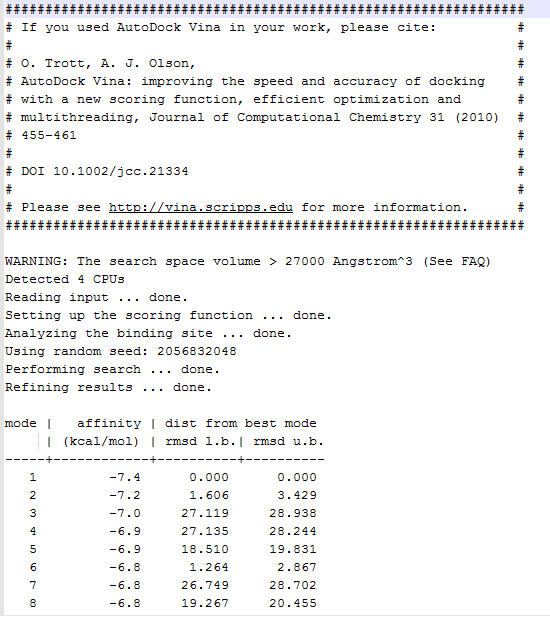
This file consists of all the poses generated by the AutoDock Vina along with their binding affinities and RMSD scores. In the Vina output log file, the first pose is considered the best because it has more binding affinity than the other poses and is without any RMSD value, but you can choose the appropriate pose and visualize it in PyMol viewer.
Please share if you like this article!
If you find any difficulty, then feel free to mail me at muniba@bioinformaticsreview.com.
Reference
- Trott, O., & Olson, A. J. (2010). AutoDock Vina: improving the speed and accuracy of docking with a new scoring function, efficient optimization, and multithreading. Journal of computational chemistry, 31(2), 455-461.